Showing posts with label how to. Show all posts

Wednesday, February 22, 2012

Project Pinterest: String Word Art


I pinned the string word art idea from the Honey and Fitz blog. It was so beautiful! I knew I couldn’t compete, but thought I’d give it a shot. I didn’t follow her wonderful directions very well and substituted a lot of things. Probably the reason hers turned out beautifully and mine, not so much.

I didn’t want to use a piece of wood because anything I ever make with wood I never get it on the wall because that means I have to find a stud finder and who likes all those extra steps anyway? So, I painted a sturdy box instead. Then put a piece of paper on it and wrote our last name in a large bubble font. I then used 1” nails and gently pushed them in over the paper.

string-art-1

Then I carefully took off the paper and wrapped the embroidery floss all willy-nilly around the nails. It turned out HORRIBLY! I take 100% responsibility for that though. I didn’t take my time. I am so not a detail person and this is detailed project.


What I did get though, was something interesting to take pictures of. That’s more my style!

string-art-3
string-art-5
string-art-4

Of course Chewbacca had to get in on the action too. He got all sorts of tangled in the pink string. Poor guy. His probably would’ve looked about as good as mine!


Chewbacca-wrapped-in-string
 Also linking up with Tip Junkie.

Can't wait to see what you've made!


Project Pinterest


Sarah:)

Thursday, February 9, 2012

Project Pinterest: Coffee Filter Wreath

I fell in love with this coffee filter wreath right when I saw it and knew I wanted to make one. Click on picture to go to its original link.


Here is my springy version. It was so easy too! Basically, you mix paint and water. Put coffee filters in the mixture. Squeeze excess water off and let them dry. Crinkle them up two at a time to make a "flower". Make a wreath backing out of a cardboard box. Hot glue each "flower" onto the cardboard.


Tip Junkie handmade projectsFun Stuff Fridays


I can't wait to check out your Project Pinterest projects!

Project Pinterest


Sarah:)

Wednesday, January 25, 2012

Project Pinterest: Blueberry Crisp

Our blueberry season here is in the middle of the summer. Blueberries are in season somewhere because for the past two weeks Publix has had them on sale for $1.99 a quart. We're eating them as fast as we can buy them! Making blueberry crisp is one thing I like to make with them.

I found the pin on Becky Bakes.


Here's the recipe!

Blueberry Crisp

Filling:
5-6 cups blueberries
2 tablespoons cornstarch
1/2 cup sugar
1 teaspoon lemon juice

Topping:
1 cup flour (I used 1/2 whole wheat and 1/2 white.)
1 cup rolled oats
1 cup brown sugar
1/2 teaspoon cinnamon
1/4 teaspoon ground ginger
1/2 teaspoon lemon zest (I didn't have a lemon so I just added a few splashes of lemon juice.)
1/2 cup butter, melted (I used Brummel and Brown.)

Preheat oven to 350 degrees. Butter a baking dish, set aside. Place the berries in a large bowl, set aside. Whisk together the cornstarch and sugar. Sprinkle over the berries and toss together. Add the lemon juice and toss until well coated. Place in a baking dish.

Combine the flour, oats, brown sugar, spices and zest in a bowl. Add the melted butter and toss until it is all well combined. Sprinkle the topping over the blueberries. Bake for 45 minutes or until the berries are bubbling all along the edges and the topping is golden brown.


Pin It


Tip Junkie

I can't wait to see what you've made! Please link up with Katie and me!


Project Pinterest


Sarah:)

Thursday, January 19, 2012

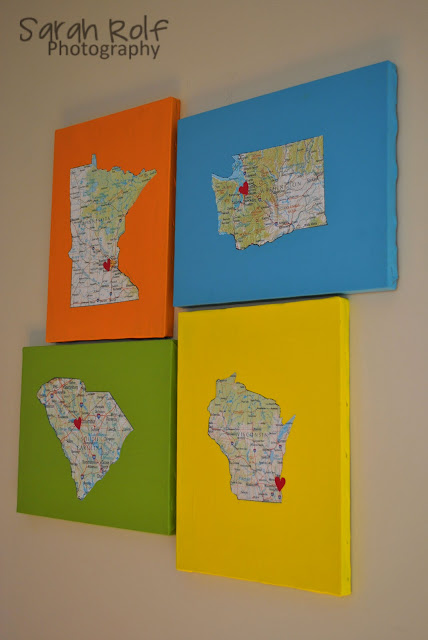
Project Pinterest: Map Art


I saw this pin on Pinterest and knew I had to make it. I fell in LOVE with this idea!


My husband and I have lived in four states together. I had four old canvases that I had painted years ago with each one having a letter of Ryan’s name. They have been sitting in his closet for probably three years. Each was a different color. I thought I wanted each canvas brown. So, I painted each canvas brown. Sticking to my true wishy-washy nature, I decided I didn’t like them in brown. So I repainted them in bright colors. These darn canvases have at least nine coats of paint on them!


I've very happy with how they came out! This project cost me about $4 in paint and that's it! 


Here are the rules:
1. Decide which pin on Pinterest you’d like to recreate.
2. Create it!
3. Flop or success, create a blog post about your re-do and include the original pin’s url.
4. Add the Project Pinterest button to your post so others can join in too!
5. Link up and check out other bloggers’ posts!


**Please go to Katie's blog to link up and get the button code. I can't get it to work right now.**


Sarah:)
Fun Stuff Fridays The Southern Institute Tip Junkie handmade projects


Wednesday, January 11, 2012

Project Pinterest: Roll-Up Shade Covered with Fabric

Welcome to Project Pinterest!


 Poor Ryan has had an ugly plain roll-up shade for as long as we've been here. 
It was one of those deals where it was supposed to be a temporary window covering, but I guess we've just never gotten around to taking care of it. 


First I ironed the very thin fleece fabric. I do not iron so this was the hardest part of the project for me!


There were a few repair issues that needed to be addressed. Like a true "let's get this done quickly" kind of DIY gal, I used my trusty Scotch tape.


I vacuumed the floor first so the fabric wouldn't be all full of dog hair. With my son's help, I put the fabric on the floor and the placed the shade on top of the fabric. I measured the actual length of the window so I would know how far to go with the fabric since you don't have to put fabric on the part that doesn't roll out. Make sense?


Would you believe my glue gun quit working at this point? Yes it did. I was so aggravated that I was willing to try anything. Elmer's All-Purpose glue it was going to have to be! Once I get going on a project all I want to do is be done with it. I am not what you'd call a detail-oriented person. 

So, I applied glue to the shade the laid it on the fabric and smoothed it out as I went along. I started at the top part of the shade.


 Periodically, I rolled the shade tightly to ensure the fabric was adhering to the shade.


After the glue had dried (in hindsight, it would've been prudent to wait to get a new glue gun) I hung the shade back up without any problem. It rolled up perfectly! That was my only worry that the fabric would make the rolled up shade too thick and it wouldn't roll back up well. This was no problem though.


This was such a simple and great project. Ryan's shade looks much better and he likes the fabric we picked out. He was pleased. I would highly recommend this project if you already have roll up shades and want to spruce up the shade without purchasing new window coverings. 

Wednesday, December 14, 2011

Project Pinterest: Kitchen Chalkboard Calendar and Menu Planner


This was one of the very first things I pinned on Pinterest. I knew I needed one of these, so I went to the local thrift store to see what I could find. I found a four-panel, old, garage door that called my name. I loved the color of the paint already so all I’d have to do was cut it in half to have two panels. My husband did that part for me. I painted the two panels with cheap chalkboard paint and am thrilled with the result!


The original pin can be found at Apartmenttherapy.com. The original used an old door, not an old garage door. Since doing this project a few months ago, I have become obsessed with chalkboard paint. I’ve painted the insides of several cabinets, paper, and old boards for my boys to be able to use in their rooms. The teacher in me is still in love with chalk!


Here are the guidelines for Project Pinterest:
1. Decide which pin on Pinterest you’d like to recreate.
2. Create it!
3. Flop or success, create a blog post about your re-do and include the original pin’s url.
4. Add the Project Pinterest button to your post so others can join in too!
5. Link up and check out other bloggers’ posts!
Project
Pinterest


Sarah:)


Wednesday, December 7, 2011

Project Pinterest: Garlicky Steak Fries

We have always loved steak fries, because of course, regular potatoes are no good (according to the children). They have to be in the form of a fry. I searched far and wide for a great steak fry recipe. I pinned this version of steak fries quite awhile ago. 

I did something I rarely do; I followed the recipe to a "T".

8 garlic cloves, minced
6 tbsp extra virgin olive oil
3 russet potatoes (about 8oz each), each cut into 12 wedges
3 tbsp cornstarch/cornflour
1 1/2 tsp coarse sea salt
1 1/2 tsp freshly ground black pepper
½ tsp garlic powder
1/4 tsp cayenne pepper


I used my favorite kitchen tool to mince the garlic: the Pampered Chef Garlic Press. Now, let me tell you something you might not know about me, I LOVE garlic. BUT, this recipe was so garlicky that we could barely eat the finished product. The original recipe says to combine the oil and garlic and microwave for one minute. Then discard the garlic and just use the oil. This did not work well for me, so every time I've made them since, I've totally skipped this step.


I drizzled the oil over the cut up potatoes and covered with Saran Wrap and microwaved for five minutes.
I combined all of the spices and sprinkled them on the hot potatoes. I placed them on a pan and baked for about 30 minutes on 440 degrees.

This was the end result! They were perfect in texture and color. What they were not perfect in is flavor. It was garlic overload to the tenth degree. However, I've made these many times after this first time and simply did away with the garlic. Sometimes I add some ranch seasoning to kick it up a notch.

If I were you, I'd definitely check out the recipe from the Purple Foodie and change according to your preferences.

Pin It


Ready to link up your Project Pinterest post?

Here are the rules:
1. Decide which pin on Pinterest you’d like to recreate.
2. Create it!
3. Flop or success, create a blog post about your re-do and include the original pin’s url.
4. Add the Project Pinterest button to your post so others can join in too!
5. Link up (on Thursdays) and check out other bloggers’ posts!


Project
Pinterest


Also sharing with Tip Junkie!
Tip Junkie handmade projects
Sarah :)


Sunday, December 4, 2011

Hello Blondie, Errrr, Monday

Hello Monday!

Hello second to last full week of school before Christmas break.

Hello week of decorating for Christmas.

Hello week of beautiful holiday desserts…ok fine. I’m just dreaming about that, not actually doing that.

I can’t get these super-easy chocolate chip blondies out of my mind.

homemade-blondie-2


Pin It


1 1/2 C packed brown sugar

1/2 C butter, melted

2 eggs

1 tsp vanilla

1 1/2 C flour

1/2 tsp baking powder

1/2 tsp salt

1 C chocolate chips

Preheat the oven to 350 degrees. Spray a 13x9 pan with butter spray. Mix the brown sugar, butter, eggs, and vanilla. In a separate bowl, combine the dry ingredients. Mix the wet and dry ingredients. Fold in chocolate chips. Spread gooey goodness in the pan, that is, if you have any left after sampling the batter.

Hello delicious calories!

Have a wonderful week!

Sharing this at Tip Junkie!

Sarah:)

Wednesday, November 30, 2011

Project Pinterest: Gum Advent Calendar

Do you believe that it's December 1st already? It's hard to believe, isn't it?!

Every year we do some kind of Advent calendar with the boys. In more adventerous years, I've made bags with sayings and candy and strung them on yarn in the kitchen and did similar bags and attached them to a yardstick with clothespins. This year, I really wanted to get them the Star Wars Advent calendar, but sadly, didn't see that until yesterday (online) so it was too late.

A few days ago I saw this wonderfully thrifty Advent calendar on Pinterest and was delighted to find a wonderful blog called http://www.jessicalynette.com .

DSC0817 512x340 Advent Calendar   from two packs of gum

I love this simple idea of using gum (in lieu of the typical sugary chocoalte) to help count down the days until Christmas. Do check this blog out for other great Advent calender ideas as well!

So I we went to the Dollar Store and bought gum that punches out of the foil wrapper. I bought four packs of gum with 12 in each pack.

I wrote the numbers 1-24 on each piece of foil where the gum pops out.


I wrapped each box with Christmas wrapping paper, then taped the two boxes together.


I made a little tag in Word so the boys would know whose is whose and not fight over it every single morning.


I think they're adorable! It's not the Lego Star Wars Advent calendar that they wanted, but it is sure cute and will serve its purpose of counting down the days until Christmas!


Pin It


Ready to link up your Project Pinterest post?


Here are the rules:
1. Decide which pin on Pinterest you’d like to recreate.
2. Create it!
3. Flop or success, create a blog post about your re-do and include the original pin’s url.
4. Add the Project Pinterest button to your post so others can join in too!
5. Link up (on Thursdays) and check out other bloggers’ posts!


Project
Pinterest
Sarah :)

P.S. Also sharing with Tip Junkie!

Friday, November 25, 2011

Upside-down Pizza in a Mug

Happy Friday ya'll!

I wanted to share this awesome kid-friendly recipe with you that a scout mom shared with us at a scout meeting. It's so much fun for the kiddos and so easy and pretty healthy too!

Upside-down Pizza in a Mug

1. Spray butter spray in mugs or other similar size dishes (we used little ramekins too) that are oven safe.

2. Combine the following ingredients for the crust. Mix the dry first, then the wet, then together.

2 C wheat flour
1 C white flour
2 1/4 tsp (or one packet) yeast
1TBSP sugar
1 tsp salt
2 TBSP olive oil
1 C very warm water

3. Divide dough into portions (we had 10 mugs) and make in to circles a bit bigger than the mug.

4. Put cheese (we used about 1/3 C, but you can use any amount you desire) in each mug.

5. Put toppings over cheese. The sky is the limit here folks!

6. Put a spoonful or two of your favorite pizza sauce. I go bargain on most things, but splurge on good pizza sauce (Classico) because it makes a world of difference.

7. Put a circle of dough over the opening of the mug.

8. Place mugs on baking pan and bake at 350 degrees for 20-25 minutes.


*I know I am a pretty horrible food photographer. I think it's because I just want to eat the food and not mess around taking pretty pictures of it. If I were to take a picture of a Brussels sprout it'd be pretty because I'd do everything in my power to try and stall so I didn't have to eat it.

Sharing at Tip Junkie and
Give me your best shot at Better in BulkPhotoStory Friday
Hosted by Cecily and Lolli

Don't forget to check out Project Pinterest every Thursday with Katie Lloyd Photography and me!

Sarah:)
Related Posts Plugin for WordPress, Blogger...